Fantastic panoramas are easy once you know how
Panoramas are big pictures made from several smaller ones, usually forming a very low profile wide view. The aim is to create a new picture that doesn't reveal its constituent parts. Panoramas can make an otherwise unassuming scene very dramatic. At the very least you can get yourself out of a pickle if you don't have a lens that can see wide enough to encompass the view that you are looking to capture. At the other end of the scale you can create jaw-dropping super-wide or super-tall views and real experts can play in the realm of 360 degree virtual views, where you can see every viewpoint from the camera's position.
The basics
To make a panorama you need to combine, or stitch, two or more separate images. You can do this simply by taking overlapping images and then aligning them manually. This is not actually as simple as it sounds. Perspective and optical distortions, and several other factors, can make the manual alignment method less than perfect. Thankfully, computers and software are very good at sorting these problems out as long as the component images are good enough in the first place. All the recent versions of Photoshop (Creative Suite and Elements) include a reasonably competent panorama stitcher, as do other photo editing packages. And there are specialist panorama stitching programs like PTGui, Panavue, Panorama Tools. Microsoft Image Composite Editor (ICE), Serif PanoramaPlus, and others. There are also online services that you can upload your images to for stitching, like another Microsoft product called Photosynth. And of course an increasing number of cameras have clever automatic panorama generating options built in, like Sony's Sweep Panorama mode, for example.
But if you are going to get really good results, you need to create good quality donor images. So here's a list of tips for doing just that:
1. Consider shooting vertically. It's easy to cover the width of the scene, but relatively difficult to cover height, and shooting vertically helps.

Shoot vertically to get more height into your panorama. (click on image to open a larger view in a new window)
2. Shoot in manual exposure mode. You don't want the camera changing the exposure from one shot to the next. Choose the best segment of the view to set the aperture and shutter speed using the camera's meter, and then use the settings in manual mode so they stay constant from one shot to the next, even if it means part of the panorama is over or under exposed. It's not a good idea to shoot panorama when the lighting conditions are changing quickly and frequently.
3. If your camera has the option, shoot in RAW mode. The better panorama stitchers work best from RAW files and it also means you don't have to worry about keeping the white balance constant from shot to shot. If you can't use RAW, again, look at the most important segment of your panorama and use the white balance temperature that suits that segment best. Don't let the camera change the white balance from shot to shot.
4. Use manual focus. As you may be beginning to realise, consistency is key. Manually fix focus on the most important part of the panorama and carefully maintain that focus setting. And don't accidentally move the zoom ring or control if you are using a zoom lens.
5. Although not critical, you will do yourself a lot of favours by using a tripod and, better still a tripod with a spirit level to ensure that the camera is completely level. This will help you to get straight panoramas with little 'wander' and wasted image space. Naturally, if you aren't using a support, try your best to maintain a constant vertical angle - aiming at the horizon is a good idea and keep the camera as straight (sideways) as possible. In camera digital spirit levels can be a great boon if you camera has such a facility.
6. Overlap your shots consistently by about a third of the width of the frame.
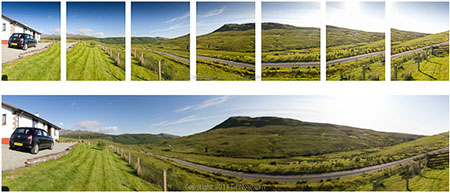
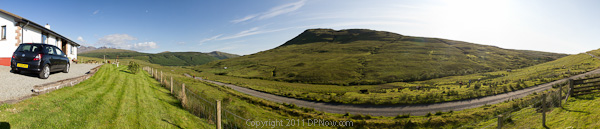
With luck you will be able to get results like this, from seven vertically framed component images:
(click on image to open a larger view in a new window)
Creating a panorama in Adobe Photoshop Elements 9
The panorama above was stitched using Photomerge in Adobe Photoshop Elements 9. Photomerge has improved over the years and is a very competent stitcher for straightforward panoramas. This is how we did it:
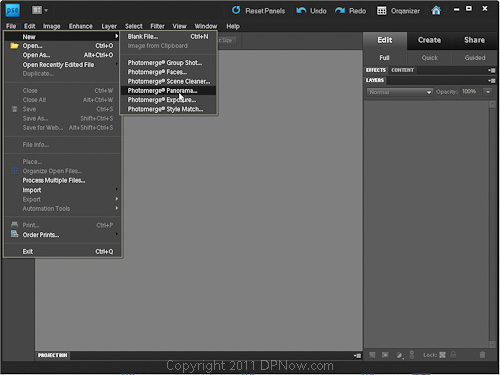
(click on image to open a larger view in a new window) First open a new image by selecting File >New > Photomerge Panorama

(click on image to open a larger view in a new window) You need to select the images that will be processed and stitched. Once selected they will be listed as above. Elements 9 offers various options for the type of panorama rendering you can choose from, but Auto works very well for most work. Experimenting with the other options could be educational. I also recommend using the blend images, remove vignette, and geometric distortion correction options.
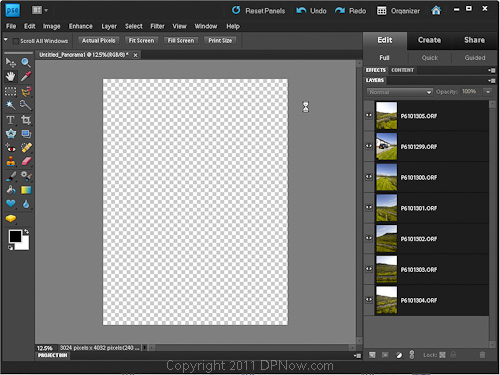
(click on image to open a larger view in a new window) The donor images are then loaded in as separate layers.

(click on image to open a larger view in a new window) Now the program analyses and aligns the images and makes corrections that ensure a seamless blend.

(click on image to open a larger view in a new window)It can take several minutes, depending on the size of the images and the power of your computer, but eventually you will see the raw stitched panorama previewed. The example above was shot hand held, and you can see that the camera wasn't quite level throughout; the panorama drifts downwards slightly. You may also notice that the segments have curved edges, which is a product of perspective and geometric corrections. At this stage Elements 9 offers to fill in the blank edges using its auto-fill feature, but this requires a lot of spare memory and can often fail. Even if it does, fail, you can just cancel it.
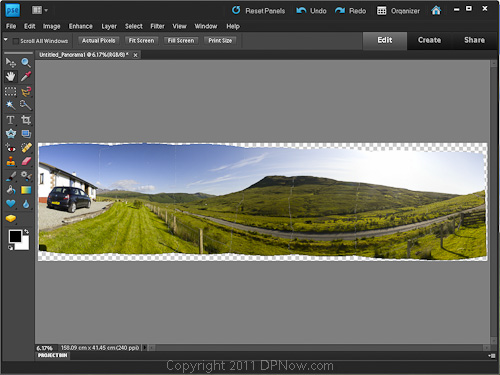
(click on image to open a larger view in a new window) Finally, you can see how well the stitch has turned out. Ignore what look like faint crack marks, they simply indicate where the blending boundaries are. They will disappear when the image is resized.

(click on image to open a larger view in a new window) Last of all, you just need to crop the unneeded edges off, and - voila!
If you would like to see a collection of panoramas produced by members of the DPNow forum and gallery, follow this link and maybe even contribute some of your own!
Reader feedback:
Discuss this story:


