We put a pre-production Konica Minolta Dynax 7D through its paces at one of the biggest sporting events of the year
Cheaper, smaller and lighter Dynax/Maxxum 5D launched

| Updated: Monday, 22nd November - This hands-on preview started with a report on a pre-production sample camera, of which we weren't able to provide image quality feedback. But now we have a production camera and an additional page has been added to this article. It contains our preliminary experience of the production camera, plus image samples exploring noise and anti-shake performance as well as a small selection of full, un-edited, image samples for you to download. This will be followed by a full, in-depth review, including a DXO Analyzer report.
| |
|
 |
 |
 |

|
 Updated on Saturday 23rd October
 after some very useful extensive feedback about the Dynax/Maxxum 7D from Konica Minolta UK's digital camera product manager, Paul Genge, this article has been extensively revised since it was first published on Sunday, 17th October. If you are revisiting this page, you are advised to read it again. We have also added a page of product shots, plus a page of system menu views for your perusal.
At Photokina 2004 in late September Konica Minolta showed working pre-production prototypes of its first digital SLR, the Dynax, or Maxxum (US market) 7D. Yesterday, Konica Minolta UK kindly invited a number of magazines, including dpnow, to try out some slightly later-issue pre-production 7Ds, at the Rugby Super League Play Off Grand Final, between the Leeds Rhinos and Bradford Bulls, in front of a near capacity audience of 65,000 at Manchester United's Old Trafford stadium.
Although some sample images from earlier specification cameras have been posted on the Web, Konica Minolta Japan requested that none of the magazines represented, including dpnow, reproduce or specifically analyse the pictures we took with the cameras provided. So none of the pictures in this article were taken using a 7D.
Although I can't comment on specific pictures taken and I shot about 300 in all after having a good look at the results from my camera, I'd say Konica Minolta Japan were being unnecessarily cautious about the quality of the images that the cameras we used were capable of. Instead, this report will concentrate on how the camera feels in use.
 We were provided with a wide variety of lenses to try out
Please bear in mind that although we had use of cameras for several hours, including the use of a wide range of lenses, during the rugby match, there wasn't really enough time to consider the camera in the same way as we would in a 'proper' review. It's possible that some aspects of the camera's operation we note in this article might be changed in the final production version, which we will be reviewing in full, according to Konica Minolta UK, in a few week's time.
Bristling
The 7D is a very business-like affair, bristling with knobs and switches. Konica Minolta's design policy is to provide adjustment of as many of the camera's settings as possible via dedicated controls on the exterior casing of the camera.
 The 7D has buttons, knobs, dials and switches galore!
The word 'dedicated' is important because very few of the controls have multiple functions and hardly any need to be operated at the same time as another. This does make for a busy, some might say cluttered, layout, but it didn't take very long to get used to it. For the most part, users of the Dynax or Maxxum 7 film SLR, upon which the 7D is based, will feel very much at home.
 The large 2.5 inch LCD screen also function as the status panel and you can select mode detailed view (left) if you wish
You won't find a separate LCD status panel on the 7D. Instead, the excellently large 2.5 inch colour LCD on the back of the unit performs all the functions of an image review monitor, configuration menu display and control status display. A pair of proximity sensors under the viewfinder eyepiece switch off the control status display when your face is pressed close to the back of the camera when using the viewfinder. It then switches it back on again when you remove the camera from your eye to examine the screen once more.
Concerning the LCD status screen, Paul Genge explains: "The rear LCD Navigation display has three settings, full display, large key feature display and off. These are selected in rotation via the second button on the left of the LCD. When set to 'off' the screen will reignite to show the change of any button control before turning off again."
"When set to either of the first two positions it will remain lit until the proximity sensor detects the user holding the camera to their face and then dim the screen to avoid distracting the user's peripheral vision."
Paul remarked on a related point in my original article: "You refer to conserving battery power, this is a factor but not the most significant. The usage of the screen does not impact too greatly on the power performance of the camera compared to other functions such as the inbuilt flash and burst capture."
 A pre production 7D on the touch line at the Rugby Super League Grand Final yesterday, fitted with a G-series 300mm f/2.8 telephoto
Each time a mode dial or knob is used, the status screen lights for a few seconds. In fact the information remains live on the screen but the backlight switches off to save power. Paul Genge describes in more detail how the status menu and viewfinder proximity sensors work on
page 2 of this article.
We started off the evening with fully charged batteries and after about two hours of fairly constant snapping, most of us were seeing battery low warnings, but considering most of us had shot, on average, 300 frames, battery life appears to be very respectable. Paul Genge also reminded me that the batteries we were issued with were brand new and had only been charged once, so charge life duration can be expected to improve after a few more charge cycles that will bring the battery to full efficiency.
The on/off switch is on the left side of the body, so you can't switch the camera on when holding the camera one-handed. Several of the key controls are selected and adjusted via the two large top-plate knobs and integrated collar dials.
There wasn't enough time for a thorough briefing on how to use the our cameras, so the evening served as a good test of how easy or otherwise the camera would prove to be in use. Not being familiar with the original Dynax/Maxxum 7, it didn't seem possible to alter the exposure compensation dials for either flash or normal exposure in anything other than half-stop increments even though the specifications suggest this should be possible.
 How do you get one-third EV adjustments? Look at the yellow legend on the knob
The status screen is calibrated in one thirds of an EV. Only after staring at the exposure adjust knob for a while did I realise that one half was calibrated in half-EV units while the other half was calibrated thirds.
One of the few controls that has multiple functions is the slightly under-sized four-way navigation pad. This has a collar switch that lets you choose AF points using the navigation pad.
Metering mode switch problem
 A collar around the AE lock button selects the metering pattern mode. It often found its way to spot meter mode all by itself
Above the navigation pad is a three-position switch that lets you choose the metering mode. I found it was easily switched to spot metering mode accidentally and I hope the action of this switch will be stiffer in the final production camera. Paul Genge tells me that this selector is not known to be a problem so it might have been limited to my sample camera. I'll be keeping an eye on this selector when our production review camera arrives.
The navigation pad also switches between standard playback view and information view with a histogram and flashing regions to indicate both over and under-exposed areas on the image. The same pad rotates the image in 90 degree steps, which Paul corrected me on from the original article, when I mistakenly said 180 degrees. Paul makes some interesting additional remarks regarding the large screen and the ability to rotate the screen view on
page 2.
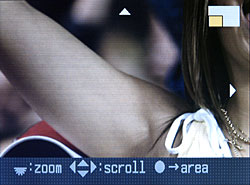
To zoom in on an image, you need to press a zoom button on the left of the LCD and then turn an embedded thumb wheel. The navigation pad also lets you move the zoom focus around the frame as you would expect.
Alloy chassis
Reassuring solidity is the impression you get when picking up a 7D. A magnesium alloy chassis, supplemented by high quality plastic mouldings, forms the exterior of the camera. The camera doesn't feel particularly light, though this is a comment that is meant to be positive - it's not too light.
The 7D is comfortable to hold and feels secure. The viewfinder is bright and serves critical focusing well. The nine AF points in the viewfinder light up and each one resembles a slim red LED some how embedded in the focusing screen. Paul thought I meant that 'LED' really were embedded in the screen, but I only meant to give the viewed impression that it was as if LEDs were embedded there. The focus points lights are projected, just as in a number of other DSLRs and Paul tells me the layout is very similar to the existing Dynax/Maxxum film SLR. It's one of the better implementations of illuminated AF points I've seen.
 Jamie Harrison, technical editor of What Digital Camera magazine, tries the 7D for size at the game
The conditions on the day, well evening actually, were very demanding, with stadium lighting and lots of dark areas. In general, the AF system worked well, though focus hunting was occasionally experienced. Until we get to try a production 7D side by side with some of its key rivals, we'll reserve judgment, but initial impressions were pretty favourable.
A subjective observation, admittedly, but I didn't find the positions of the shutter release and the adjustment dial in front of it ideal. The shutter button was a little too close to the body so my forefinger tended to miss the button and inadvertently press the adjust dial instead. Not everyone will have this problem, I'm sure, but it was something I had to get used to.
 Amateur Photographer magazine's Angela Nicholson targets the Super League Grand Final action
One thing I was definitely impressed by was the 7D's continuous shooting capability. It can shoot three frames per second, which is not spectacular, but more importantly you can keep this up for nine frames in Extra Fine JPEG mode, 15 frames in Fine JPEG high resolution mode and up to 43 frames in low resolution. As long as the buffer wasn't full, shutter responsiveness remained very good.
Anti-shake
As we aren't allowed to say anything about the pictures we took, there really isn't that much I can comment on regarding the 7D's all-important anti-shake system. One thing I can say is that compared to other cameras that have anti-shake where the system works visibly through an electronic viewfinder or in an SLR where the stabiliser is in the lens, on the 7D you don't see anything. It all happens behind the camera's quick-return mirror as the CCD sensor itself moves.
Occasionally I could feel a vibration through the palm of my hand while holding the camera usually when powering the camera on or off, but it's hard to judge whether or not this was the AF motor in the camera parking itself, or the anti-shake doing the same thing. Independent feedback suggests this is, indeed, the lens AF parking itself. It's not something I have noticed in other DSLRs.
The 7D's shutter and mirror are reasonably quiet, though the sound they make has a slightly metallic ring to it that is not as refined as some rival cameras. Of the lenses I tried, none were particularly quiet, they are certainly not in the same class of refinement as Canon USM lenses, for example.
Preliminary conclusion
Could I become attached to a 7D? Most definitely, yes. I liked the viewfinder and the menu system, which we'll look at in more detail later and I liked the general 'persona' of the 7D. There is still a lot to learn about this camera, but after having used a pre-production sample, the experience was mostly positive and I look forward to testing the finished product soon.
On the
next page we look close-in at the 7D's design and construction.
Konica Minolta official Dynax/Maxxum 7d
press release and specifications
Order your Konica Minolta Dynax/Maxxum 7D from Adorama in the US or from Amazon:
or through
|
|
|
| |
|
| Click on the flag that best relates to your location |
| Each Amazon outlet can ship to most countries in the world. |
Design and construction
Cheaper, smaller and lighter Dynax/Maxxum 5D launched
Note - If you have come straight to this page, you may want to go to page 1 first as this has been revised after feedback from Konica Minolta UK.
Origins
The Konica Minolta Dynax/Maxxum 7D is directly developed from the Dynax/Maxxum 7 film SLR (below). Much of the retained controls from the 7 are in the same places on the 7D's body. Even the large mono status LCD legends from the 7 are similarly reproduced on the big 2.5 inch colour LCD of the 7D. One immediately noticeable difference is the tilting of the exposure compensation knob via the 7D's dropped 'shoulder' and another is the styling of the top of the pentaprism that incorporates the pop-up flash unit.
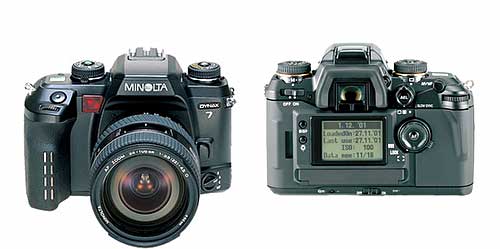 Although the 7D shares a lot with the original 7 film SLR (above) a quick glance, especially at the front, doesn't instantly indicate this.
The hand-sensitive grip, which forms part of the 7's automated autofocus and auto exposure activation system, has also been dropped, though the proximity sensors that served the 7's Eye Start system remain. Konica Minolta UK's digital camera product manager, Paul Genge, comments: "The two sensors below the viewfinder are not light sensors, they are proximity sensors, just as with reversing sensors on the back of executive cars. We have been using them since 1992 with the introduction of the Dynax 7xi. Since then we have used them in ten Dynax SLR film cameras and six DiMAGE digital cameras.
"They have been used for different purposes with both product types. In Dynax they were used in combination with grip sensors for a feature called Eye Start that was tasked with starting the AF without the pressing of the shutter release button partway. The grip sensors detected moisture in your skin and knew that the camera was being held.
"As the camera was brought to the user's eye the proximity sensors detected this and activated the Eye Start. In the Xi series from 1992 cameras were launched with Xi lenses that also provided automatic composition of the subject using the lens' zoom. This was stopped in the following si series as consumer demand was not great enough.
"In the DiMAGE 7 and A series, as well as the one 5 model, all have proximity sensors. These alternate the view between the EVF and rear LCD according to whether the camera is being held away from or close to the user's face. This technology remains exclusive to Konica Minolta."
Controls and exterior features identified
 (Front of camera, above) A: Front control dial, B: Shutter release button, C: White balance dial, D: White balance button, E: Pop-up flash (not deployed), F: Konica Minolta proprietary flash hot shoe (cover on), G: Lens release button, H: AF mode selector, I: Self timer lamp.
 (Rear of camera, above) A: Playback/review button, B: Delete button, C: Image preview magnify/zoom button, D: Display mode button, E: Menu button, F: On/off power switch, G: Flash exposure compensation dial, H: Exposure compensation knob (with central release button), I: Eye-level viewfinder eyepiece (with dioptre adjustment), J: Proximity sensor for automatically switching display on and off, K: Exposure mode selector knob with central release button, L: Drive mode dial, M: Auto exposure lock button and exposure meter area mode selector, N: White balance mode selector, O: Direct Manual Focus (DMF) switch, Q: Rear control dial, R: Lip for opening compact flash slot flap, S: Four-way navigation pad and AF point selector button in centre, T: Focus area selector, U: Memory card busy indicator lamp, V: Anti-shake mode selector, W: Memory set button, X: ISO speed select button, Y: LCD status and preview monitor screen, Z: Screen protect attachment locators.
 Above is a photographer's eye view of the camera virtually everything apart from the AF mode selector is visible
 Minolta has used a proprietary flash shoe (above) fitment for some time
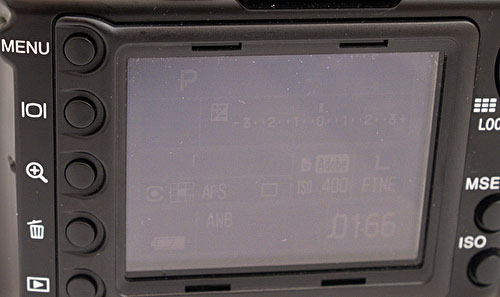 You can just see (above) that the status display remains active while the camera is switched on, even when the back light has switched off
 There aren't many other digital cameras that have dedicated dials for flash and non-flash exposure compensation
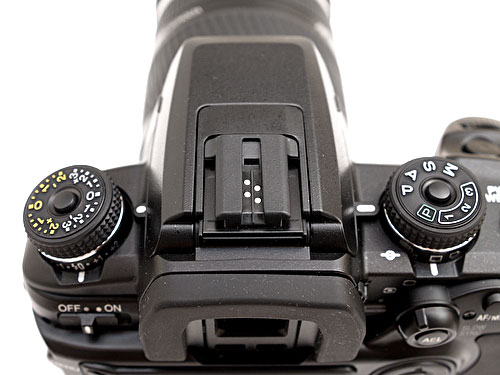
 This close up shows the white balance mode selector and the exposure mode dial, with its three custom function memory settings. The shutter release button is unfashionably close in to the body
 On the underside of the exposure mode selector knob is the drive mode selector. You can also see the exposure meter area mode selector. On my sample pre-production camera this was too easily knocked into the left-most spot meter mode position
 With the large screen accommodated there is precious little space for the numerous controls but Konica Minolta's design risen to the challenge well and the space is used well without over-compromising usability
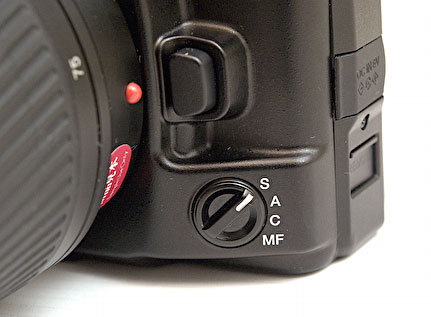 Above is the AF mode selector. The 'A' setting stands for Automatic AF and leaves the camera to choose between single shot (S) and Continuous (C) depending on the subject's motion. MF, of course, is manual focus mode
 No difficulty was encountered inserting or removing compact flash cards
There has been some speculation about whether or not the 7D supports Lexar's Write Acceleration (WA) for reducing memory card read/write times. Paul Genge answers: "Konica Minolta is not a partner of the Lexar Write Acceleration scheme. We do have ongoing agreements with Lexar, also Sandisk and IBM/Hitachi for compatibility of memory cards in all digital products. WA is not part of that program at this time, should this change we will announce it."
We were issued 1GB Sandisk Ultra II cards, which are at the top-end of memory card performance and we experienced no negative performance issues in this respect.
As there was no RAW processing software available, we used best quality JPEG mode. File sizes ranged between just under 2MB to just over 3.5MB. In our cameras the JPEG file extension used was, unusually, .JPE rather than.JPG or .JPEG. Thumbnail files (.THM) of around 5K in size were also created by the camera for each image shot. (Note - I have since discovered that the .JPE file extension and .THM thumbnails are there because I set the camera to Embedded Adobe RGB mode. sRGB JPEGs carry the standard .JPG file extension and there is no accompanying thumbnail image and RAW files carry the .MRW file extension plus a thumbnail. Thanks goes to Trevor Nicholson for pointing this out.)
 The high-speed USB 2.0 port lies under the compact flash compartment door, but this incorporates a little hatch for access without needing to open the door
 The external DC power socket is covered by a very flimsy rubber flap
 as is the PC sync flash socket above
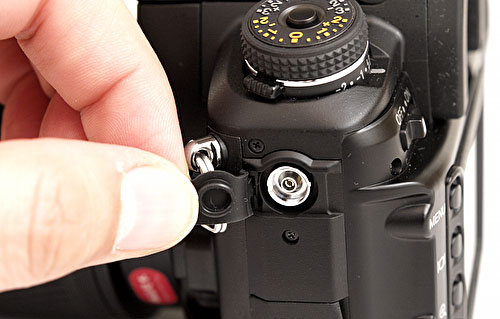
 Meanwhile, the remote control cable connector gets its own sliding hatch
 There isn't a great deal to say about the underside of the body, though a possible area of weakness for wear and tear is the base of the rubber grip, which is quite thin and not entirely bonded to the body at the edges. Just to the right of the Anti-Shake logo is the depth of field preview switch
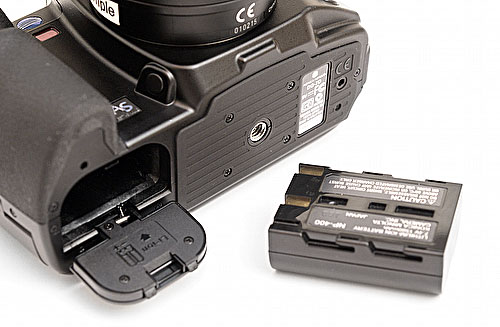 Finally, the battery, which looks much like its competitors' but makes do with just two contacts.
We don't have any shots of the camera with the lens off, which was our oversight (these pictures were rather hurriedly taken in the hotel we were staying in rather than at leisure back at the office). But we'll put that right when we get our production sample camera to review.
On the final page in this revised article, we look at a selection of camera menus.
Konica Minolta official Dynax/Maxxum 7d press release and specifications
Pre-order your Konica Minolta Maxxum 7D from Adorama in the US or from Amazon:

|

| 
|
|
| Click on the flag that best relates to your location |
| Each Amazon outlet can ship to most countries in the world. |
Camera menus explored
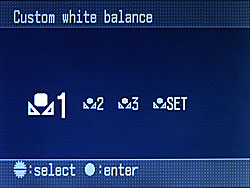
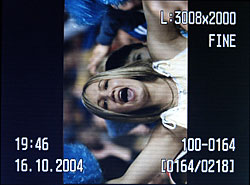
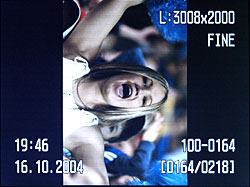
The Konica Minolta Dynax/Maxxum 7D's large LCD screen shows a variety of status displays and menus. Please not that we would normally have video-digitised the screen images below but no video cables were available. The screens were photographed instead - and using a hand-held camera too, so please excuse the slightly inconsistent quality.
 Our cameras showed firmware version 1.00e was installed
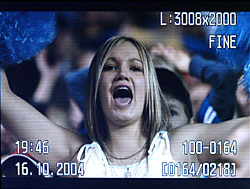
 This is what you see when the power eventually runs out
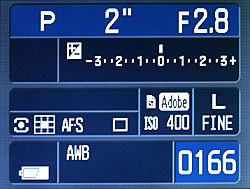
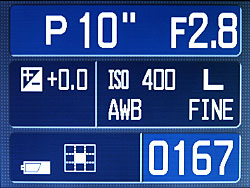
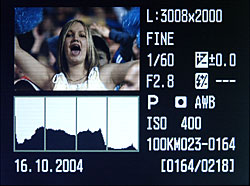
When the camera is switched on, you see a blue-toned settings displayed. If you change a setting using one of the exterior controls, the display re-appears either showing basic settings or a specialist display relating to the specific configuration. There are also two legend resolutions to choose from.
Multiple custom white balance settings (left), auto white balance (AWB) set (right)
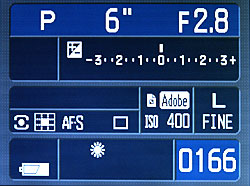
Custom white balance set on the left and daylight white balance on the right
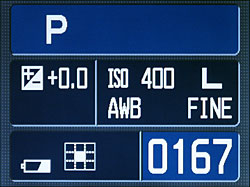
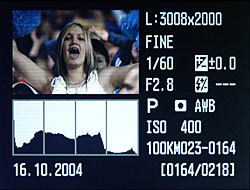
Program mode with AE meter off (left) and on (right)
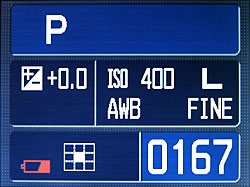 Note the red battery low warning symbol
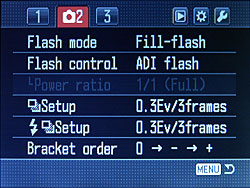
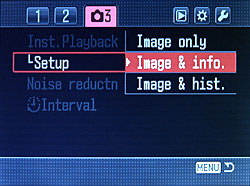
 Above are the three top-level menu groups for shooting mode adjustments and below are some of the sub-menus displayed
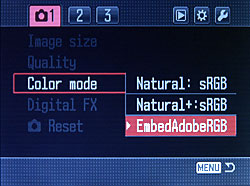 Image setting menus
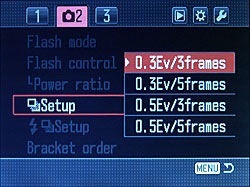
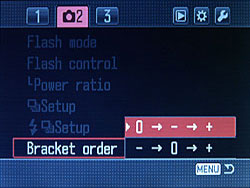
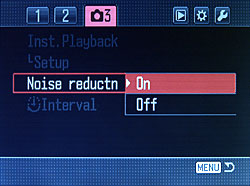
Flash and exposure menus

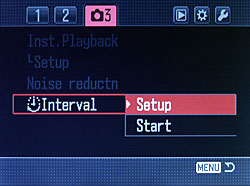
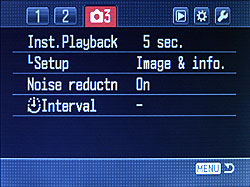
Menu group 3 contains miscellaneous settings, including interval shooting times
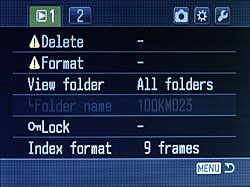
Above are the two playback/review menu groups
 File management options
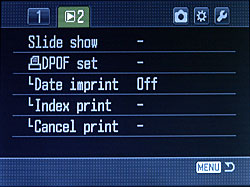 Slide show and printing options
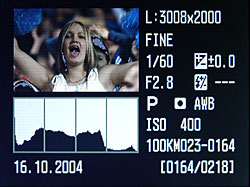 Above shows the camera settings information and histogram review mode. It's not that clear, but the three views of the same frame show highlight and shadow area warnings that flash on the camera
Playback zoom and pan examples
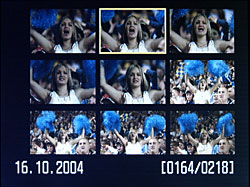
Nine thumbnails at a time can be viewed
 You can rotate the frame in review mode or clear the view of any annotations.
That's all for now in this hands-on preview of the Konica Minolta Dynax or Maxxum 7D. Look out soon for our full bench test of a production camera, including a comprehensive DXO Analyzer report, plus sample photos.
So what do you think? Does the 7D meet your expectations? Give us your views and we'll publish selected responses soon.
Konica Minolta official Dynax/Maxxum 7d press release and specifications
Pre-order your Konica Minolta Maxxum 7D from Adorama in the US or from Amazon:
|
|
|
|
|
|
| Click on the flag that best relates to your location |
| Each Amazon outlet can ship to most countries in the world. |
UPDATE: Here are our initial results, including sample images, from our production Konica Minolta Dynax 7D
The arrival of our production review 7D did not co-incide with good weather here in autumnal Hemel Hempstead. However, I was able to grab a few shots in slightly hazy lunchtime sun, plus some night time shots in Piccadilly Circus in the West End of London.
My full review of the 7D, including a comprehensive DXO Analyzer report, will appear in a few days time, but in the meantime here are some observations and samples to start with.
The new review camera has the same 1.00e firmware number as the pre-production camera used last month. 'e' stands for Europe and I understand that US models will be designated 1.00u and Japanese models 1.00j.
The easily knocked meter mode switch, which kept on finding its way back to spot mode, has behaved itself in the new camera.
As with the pre production sample, the production model's shutter and mirror return action noise is quite metallic. It's not loud, but you notice it, but there is no excessive vibration felt as you hold the camera.
I was supplied a 17-35mm f/2.8-4 AF D lens. This has an equivalent focal length of 25.5-52.5mm. With such a short focal length lens, testing the camera's anti-shake performance hasn't been easy, but I can report that I have been able to hand hold some shots down to 1/6th second with good results.
Most of the pictures I have taken so far have been using the Extra Fine JPEG mode, though this produces comparatively large files averaging 6MB.
Image Noise

Noise seems to be controlled well at high ISOs. The following, all shot using auto exposure, are all 1:1 crops, 340 pixels-wide, reproduced without additional compression in PNG format:
 ISO 100, 1/100th sec, f/10
 ISO 200, 1/300th sec, f/7.1
 ISO 400, 1/400th sec, f/10
 ISO 800, 1/1000th sec, f/9
 ISO 1600, 1/1250th sec, f/10
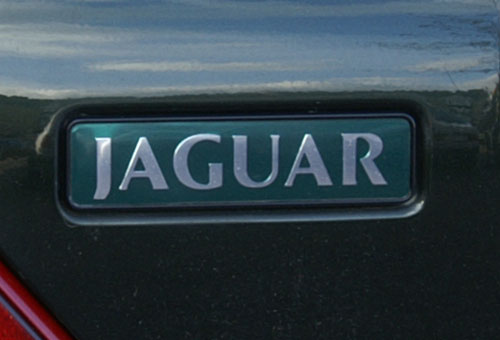
Anti-shake
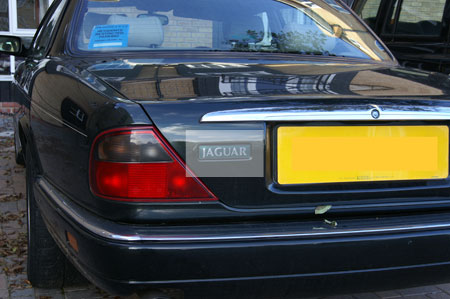
With the lens zoomed to full tele (35mm or 52.5mm equiv.) and kneeling one knee on the ground, but otherwise unsupported, I took a series of hand-held shots at 1/30th, 1/15th and 1/8th second with ISO set to 100.
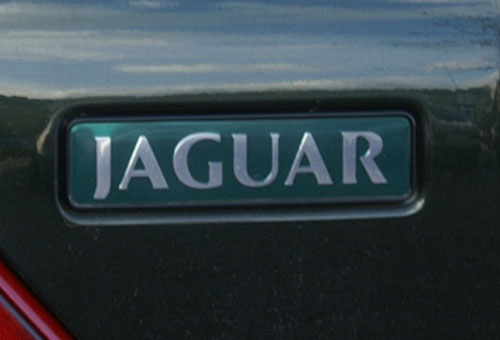
The following are representative of the typical results I was getting. They are selective, unsharpened, 500 pixel-wide crops of a badge on the back of a car parked in a shaded situation and each picture is reproduced 1:1 (1 image pixel to 1 screen pixel).
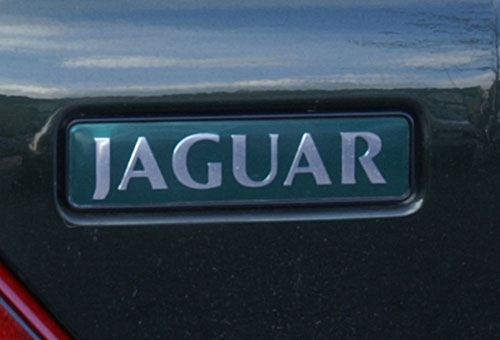 1/30th, f/8
 1/15th, f/13
 1/8th, f/18
Up to 1/15th sec. I was able to get consistently steady shots. From 1/8th onwards, I was getting softer results and the occasional obviously blurred frame. It could be that the softness has something to do with the very small aperture (f/18) necessitated to force the shutter speed down, but certainly with the lens I had, 1/15th sec. was probably the practical limit for dependable anti-shake performance. That said, the 1/8th second image could be sharpened with some care and be printed with acceptable quality. The full review will explore this feature in a lot more detail.
Original sample images
Below are thumbnails linked to original sample images. Please read and accept the terms of use before clicking on the thumbnails.
Terms of use
Please note that the largest of these is 6MB and will take around a minute and a half to display even if you have a 512 megabit broadband connection. If you are connecting via dial-up, expect to wait 20-25 minutes per image. The copyright of these images is the property of dpnow.com. Dpnow.com permits you to view and download these images for personal and private evaluation only. Permission is not granted for use of these images for any other purpose. Please do not deep link these images from a page on another Web site.
Rather than view these images in your browser, which will leave copies on your hard drive in your browser's cache, you should download them to your computer. Use the download target image option in your Web browser or use the linked description of each picture to download the image in a Zip archive.
|  |
Canal scene, winter sun, 1/250th sec. f/9, ISO 100, sRGB, 3008 x 2000 (6.0 MP), Matrix metering, auto exposure, f=26mm (29mm equiv), auto white balance.
| Flash portrait (built in flash) 1/60th sec, f/5.6, ISO 100, sRGB, 3008 x 2000 (6.0 MP), Matrix metering, auto exposure, f=35mm (52.5mm equiv), auto white balance.
|
 |  |
| Night time scene, 1/6th sec, f/5.6, ISO 100, Adobe RGB, 3008 x 2000 (6.0 MP), Matrix metering, auto exposure, -0.5EV bias, f=22mm (33mm equiv) , auto white balance. |
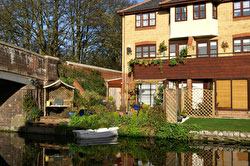
Canal cottage, 1/400th sec, f/7.1, ISO 100, sRGB, 3008 x 2000 (6.0 MP), Matrix metering, auto exposure, f=22mm (33mm equiv), auto white balance.
|
We'll have more for you in a few days.
We're always keen to hear your comments
, drop us a line with your thoughts and we might even publish them (unless you indicate otherwise of course).
Pre-order your Konica Minolta Maxxum 7D from Adorama in the US or from Amazon:
|
|
|
|
|
|
| Click on the flag that best relates to your location |
| Each Amazon outlet can ship to most countries in the world. |